English
 عربى
عربى BLDC
BLDC

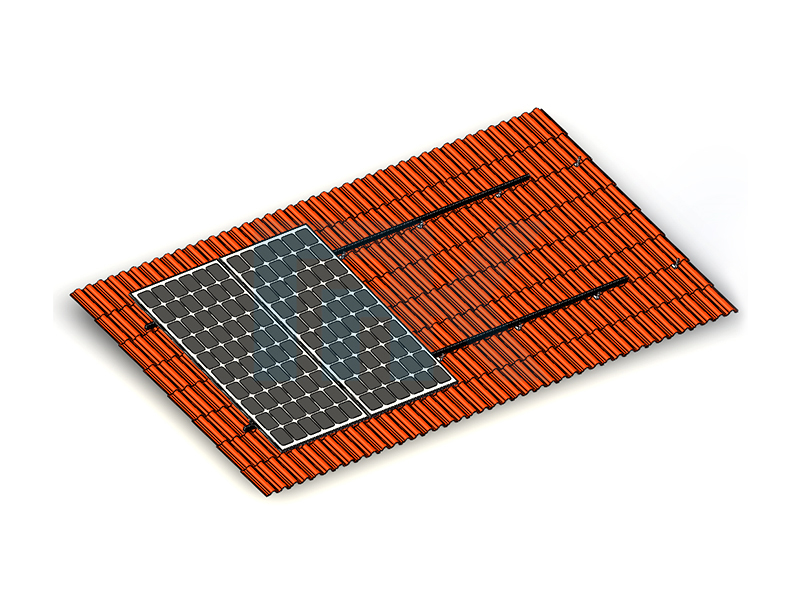
Installing solar panels on a tile roof presents a unique set of challenges that standard composition shingle mounting hardware simply isn't designed to handle. Clay and concrete tiles are brittle, uneven, and prone to cracking under improper load or foot traffic, which means a purpose-built approach is essential to avoid costly roof damage during and after installation. Tile roof solar mounting systems address this challenge directly, using specialized hardware engineered to distribute weight properly, maintain a watertight seal, and secure panels firmly without compromising the tile roof's structural integrity or appearance. This article walks through how these mounting systems work, the different hardware options available, and what homeowners and installers should evaluate before starting a tile roof solar project.
Content
- 1 Why Tile Roofs Require Specialized Solar Mounting Hardware
- 2 Common Types of Tile Roof Mounting Hardware
- 3 Key Features to Evaluate in a Tile Roof Solar Mounting System
- 4 Comparing Mounting Approaches for Different Tile Types
- 5 Best Practices for Installing Solar Mounts on a Tile Roof
- 6 Common Mistakes That Lead to Tile Roof Damage or Leaks
- 7 Maintenance Considerations for Tile Roofs with Solar Installations
Why Tile Roofs Require Specialized Solar Mounting Hardware
Unlike asphalt shingle roofs, which offer a relatively flat, forgiving surface for standard mounting hardware, tile roofs present a curved, brittle, and uneven surface that makes direct panel attachment far more complicated. Clay and concrete tiles can crack under concentrated point loads, and improperly installed hardware can create gaps or stress points that lead to water intrusion long after the solar installation is complete.
Tile roof solar mounting systems are engineered specifically to address these concerns. Rather than attaching directly to the tile surface, these systems typically anchor into the roof's structural rafters or battens beneath the tiles, while specialized hardware components lift, replace, or work around the surrounding tiles to maintain both a secure structural connection and a properly sealed roof surface.
Common Types of Tile Roof Mounting Hardware
Several distinct hardware approaches exist for mounting solar panels on tile roofs, each suited to different tile profiles and installation preferences.
Tile Hooks
Tile hooks are metal brackets designed to sit beneath a raised or replaced tile, hooking over the batten or rafter structure below to create a secure attachment point without penetrating the tile itself. This approach is widely used because it minimizes direct contact stress on the tile while still providing a strong structural connection to the roof framing.
Tile Replacement Mounts
Some systems use a solid mounting base that physically replaces a section of tile, integrating a flashed, waterproof attachment point directly into the roof surface. This method often provides a very clean, low-profile appearance, though it requires precise measurement and fitting to match the surrounding tile pattern.
Elevated Tile Mounts
Designed for curved or high-profile tiles such as barrel or S-shaped clay tiles, elevated mounts raise the panel racking above the tile's curved surface, allowing consistent panel alignment despite the uneven tile profile beneath.
Key Features to Evaluate in a Tile Roof Solar Mounting System
Not all mounting systems are created equal, and evaluating specific features can help ensure the chosen hardware performs well over the long service life expected of a solar installation.
- Corrosion-resistant materials, typically stainless steel or aluminum, to withstand long-term outdoor exposure
- Compatibility with specific tile profiles, since flat, curved, and interlocking tile styles each require different hardware geometry
- Reliable flashing integration to maintain a watertight seal around each mounting point
- Adjustable height or leveling capability to accommodate uneven or curved tile surfaces
- Load rating sufficient for local wind and snow load requirements in the installation region
- Manufacturer certifications or engineering documentation to support local permitting requirements
Comparing Mounting Approaches for Different Tile Types
Because tile roofing comes in several distinct profiles, the ideal mounting approach can vary significantly depending on the tile style involved.
| Tile Type | Recommended Mounting Approach | Key Consideration |
| Flat Concrete Tile | Standard tile hook system | Relatively straightforward alignment and installation |
| Barrel or S-Shaped Clay Tile | Elevated tile mount | Requires height adjustment to clear curved tile surface |
| Interlocking Tile | Tile replacement mount | Must match surrounding tile spacing and interlock pattern |
| Flat Slate-Style Tile | Tile hook or low-profile flashing mount | Brittle material requires careful handling during installation |
Best Practices for Installing Solar Mounts on a Tile Roof
Proper installation technique is just as important as choosing the right hardware when it comes to protecting a tile roof's long-term integrity. Installers should always locate and anchor mounting points directly into structural rafters or trusses, rather than relying on the tile or roof decking alone to bear the load, since tiles are not designed to support significant structural weight on their own.
Minimizing Tile Breakage During Installation
Because tiles are brittle and prone to cracking under foot traffic or improper handling, installers should use caution when walking on the roof and consider protective padding or designated walk paths during the installation process. Having replacement tiles on hand for any that crack or break during installation helps avoid delays and ensures a consistent finished appearance.
Ensuring Proper Flashing and Waterproofing
Each mounting point penetrating the roof surface should be properly flashed according to the hardware manufacturer's specifications, with flashing integrated beneath the surrounding tiles rather than simply caulked over the top. Proper flashing technique is one of the most critical factors in preventing long-term leaks at solar mounting points.
Common Mistakes That Lead to Tile Roof Damage or Leaks
Several recurring mistakes account for the majority of problems associated with poorly executed tile roof solar installations. Using mounting hardware not specifically designed for tile roofs, such as flashing kits intended for asphalt shingles, is one of the most common errors, often resulting in an inadequate seal that leads to water intrusion over time.
Failing to properly support or reinforce tiles surrounding a mounting point can also lead to cracking under wind load or thermal expansion and contraction over seasonal temperature changes. Additionally, inconsistent or insufficient anchoring into the roof's structural framing, rather than the tile or decking layer, can compromise the overall load capacity of the mounting system, creating a safety concern under high wind conditions.
Maintenance Considerations for Tile Roofs with Solar Installations
Once installed, tile roof solar mounting systems generally require minimal ongoing maintenance, but periodic inspection helps catch potential issues before they develop into larger problems. Homeowners and maintenance teams should visually inspect flashing points periodically for signs of cracking, tile displacement, or discoloration that might indicate water intrusion beneath the surface.
It's also worth confirming that any tiles surrounding the mounting hardware remain properly seated and undamaged, particularly after severe weather events such as heavy wind or hail. Because accessing a tile roof for inspection carries the same breakage risk present during initial installation, many homeowners opt to have these checks performed by a qualified solar or roofing professional rather than attempting a DIY inspection.